

How To Repair Cut Floor Joist
Repair Sagging, Cracked or Cleaved Floor Framing.
By Rob Robillard
I recently had to repair a floor joist that had cracked. I suppose somewhere in the world there are floor joists that need to be repaired that have broad open, articulate joist trophy, with no pipes, wires or obstructions. Unfortunately, that'south not my world.
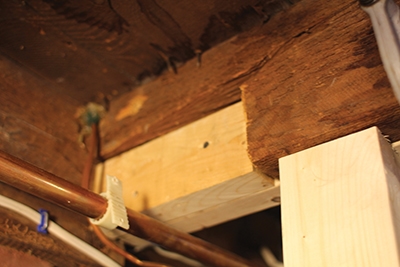
This joist was installed in 1863 and was located directly below where a heavy fridge at present lives. From initial inspection information technology appeared that someone had notched the joist too much and and so installed a makeshift patch. The notch was made where the flooring joist recessed into a wood beam, supported by chimney corbeling.

Corbeling is an "old school," overlapping arrangement of bricks with each grade extending farther out from the vertical of the wall than the grade below. Corbeling was done for ornamentation or to back up structural beams, like in this situation.
My approximate is that many years back, an old vent or furnace pipe ran through this location, and the contractor needed to cutting this section of joist to accomplish the installation. Today, this type of notch is not allowed by code.
Notches can compromise the strength of floor joists, although some notches are acceptable, depending on their location as dictated by the International Residential Code [IRC]. Here's a good dominion of pollex:
- Notches should be no deeper than one/6 the depth of the joist.
- Notches at the end of the joist should be no deeper than 1/four the depth.
- Limit the length of notches to 1/3 of the joist's depth.
Not only did the aggressive notching doom this joist, it afflicted the structural integrity of the floor system above. To make matters worse, the refrigerator to a higher place our joist was causing the floor to sag.
A severely, cracked or sagging flooring joist tin can get worse over time, causing the floor above it to slope or become unleveled.
Tools & Materials Required
- Level
- Reciprocating saw
- 5-pound hammer
- Record measure
- Structural screws and joist hangers if applicable
- Ability saw
- Framing lumber or laminated lumber if needed for force
- Wood shims
- Hydraulic jack or metal jack posts
- Misc. hand tools
- Impact commuter and accessories

Sister Joist
Correcting a problem joist is an easy repair and is normally accomplished by fastening a new joist next to a damaged floor joist, doubling the thickness of the framing fellow member. This is referred to equally "sistering."

This floor arrangement was congenital in 1863 and was later reinforced with a mid-bridge beam approximately 7 feet away. The damaged joist measured exactly 2 inches by vi-1/4 inches deep—a true 2×half-dozen.

My arroyo was to install a new joist adjacent to it, resting one end three inches onto the mid-bridge beam and installing a joist hanger on the other side. I would sister the two together with structural screws.
The space between the beam and the floor boards to a higher place was vii inches then I decided to use regular framing lumber and rip a 1/2-inch off the width of a two×8 framing member. (Note: A nominal ii×eight board measures 1-one/2 by 7-1/2 inches.)
Cut the New Joist
When installing a new joist on a foundation wall yous may need to notch the lesser edge and so it tin fit. Each situation is dissimilar. Follow IRC and your local edifice code guidelines for notching framing material before doing this repair.

I used a circ saw to cutting the new joist and then it would sit down iii inches on top of the beam. After cutting to length, I then ripped the new joist to fit.
Room for the repair
I had a few obstructions in my manner; there were electrical wires, thermostat cables, a refrigerator water line, electrical conduit and heating pipes in the area. I too found former nails and piping brackets, left in place from years past—I detest that.
The first stride was to temporarily remove or relocate the electrical cables and pipes. This necessitated shutting off the electricity and disconnecting a smoke alarm and some thermostat wiring. I also had to pull wire staples and unscrew conduit and heating piping supports. These items would all need to exist replaced after sistering the joist.
One time complete I checked the subfloor to a higher place for whatsoever penetrating nails that would inhibit the new joist. I found none, but I would have used cease nippers and cutting them flush with the subfloor.
I also removed all the nails and onetime piping hangers left from old mechanicals.

Jacking the Joist
I positioned the new joist in place and then gear up upwards a vi-ton hydraulic jack with a jack post. The new joist fit in the space sideways only would non tilt into vertical position. The reason was the corners of the new joist, when at a 45-caste angle, caught the elevation of the beam and the bottom of the floor boards. One time the joist was vertical it would fit fine—hence the slight flooring jacking.

I attached two two×4's together to make a uncomplicated jack mail service. I then plumbed the ii×4 jack post and placed it direct under the croaky joist in order to elevator a pocket-size sag out of the quondam joist as well equally create a tiny fleck of room for me to go the new joist against the old one at the beam.
A note on jacking: Jacking also fast can cause wall cracks to a higher place and many times it's better to jack slowly. A good rule of thumb is to jack only 1/viii inch a day, to go a joist level.
After lifting the cracked joist, I used a 5-pound hammer to carefully move the new joist into position.
I needed to hammer the joist only where it sat on the beam, since this is where the joist was catching.

If the new joist is hitting a beam and the floor above, and jacking is non an option, an alternative approach is to cut small-scale bevels on the two opposing edges that the bear upon the axle and flooring board. This helps the joist turn into the proper resting position.
Making a Jack Post
I made a fast and simple jack post with two 2×4 screwed together. I was not lifting a lot of weight or lifting and holding for a long flow of fourth dimension so I chose not to make a "stiff back" or "T-jack" postal service. T-shaped posts are stronger because the 2×4 boards oppose each other and counteract any bending force created during jacking.

To brand a T-shaped post, smash your pairs of 2x4s together, perpendicular to each other in the form of a "T." Secure them with framing nails or structural screws.


Installing the Sister Joist
Later the new joist was in place (vertical and next to the erstwhile joist), I used a clench to concord them together at the chimney cease.


Cut a cake to the fill the notch and screw it in place.I patched in the notch on the old joist, mostly so I had structural begetting to mountain the joist hanger. I too added a shim board to the width, to keep the hanger from deforming when fastened.

I then relocated the jack under the joist and placed a slight amount of pre-stress tension on it, ensuring that I was level, and installed a double joist hanger to support both the old and new sister joist.


The joist hanger was designed for "old work" and fits the wider faming cloth often found in older homes. I secured the joist hanger into the corbel supported axle with ii-1/2-in. structural screws and into the joists with1-1/2-in. structural screws.


To adhere the new joist to the older one, I installed a series of 3-in. structural lag screws. Once secured, I released the jack pressure level and removed the jack.
Call In A Structural Engineer
If you're concerned about the structural integrity of a sagging, cracked or twisted joist in your business firm, first telephone call a structural engineer to inspect the floor. Get a recommendation for reinforcement and strengthening measures. This type of inspection typically costs $500 to $700 and will aid with any other remodeling or building permitting projects.

Source: https://extremehowto.com/fixing-a-damaged-floor-joist/
0 Response to "How To Repair Cut Floor Joist"
Post a Comment